The Mk. III habitat is still in Florida being completed by a friend who was interested in helping with the project. It'll be shipped when complete. However it's currently freezing cold outside, and I don't see myself deploying it until the weather warms up significantly.
Until then, don't forget to follow Project Earth Rover, which is what I'll be keeping myself occupied with until it's warm enough outside to continue with Hampture.
Those who are just finding this blog and curious whether anything's been done yet, the answer is yes, the prototype habitat was deployed in a lake some time ago for five hours. You can view the video of it here. It's the larger, multi-room habitat that you're waiting on, and that'll be a while.
Wednesday, December 29, 2010
Wednesday, December 15, 2010
Minor update
In preparation for the move I've bolted down all enclosures. It was harrowing, getting them laid out just right for the tube lengths, but it turned out wonderfully. I will apply sealant tomorrow night, and by the time it dries the UHaul will be here.
All it needs now is the application of the wood sealant (which I have), holes for the air hoses (which I can drill tomorrow) and weights (which I'll buy after the move, no sense in lugging them around in a suitcase).
Thanks to everyone that's donated recently, it funded a trip to Home Depot for bolts, the wood platform, sealant, an adapter (to use the power drill as a screwdriver) and so on. Thanks also to the friend who hauled that shit back to my place, couldn't have done that part without you.
The weather is cold as fuck lately so I won't be able to put it in the water in good conscience even when complete. As compensation I'm thinking of setting up a live webcam in the Hampture Mk. II prototype, which will be in an aquarium. Until the weather improves, though, the main focus will be on Project Earth Rover.
Wednesday, December 8, 2010
More progress to report!
With the help of a local blog follower I was able to get the platform, bolts and waterproof wood sealant I needed. I've got the holes for the screws drilled in the enclosures, preparing to bolt them down. After that, I'll apply silicone sealant around the tunnel rims and affix weights to the platform. That's basically it. Behind it: The plastic shelf I was trying to use beforehand. No place to screw things down, and not quite big enough, but it would've been cool looking. Ah well.
I have about ten days until I move cross-country. I can't deploy the habitat in such cold water, but I can have it shipped to where I'm moving and wait for warmer weather while I build the interior elements (like the clover garden). Nice to be moving forward, anyway.
 Behind it: The plastic shelf I was trying to use beforehand. No place to screw things down, and not quite big enough, but it would've been cool looking. Ah well.
 I have about ten days until I move cross-country. I can't deploy the habitat in such cold water, but I can have it shipped to where I'm moving and wait for warmer weather while I build the interior elements (like the clover garden). Nice to be moving forward, anyway.
Thursday, November 25, 2010
Sorry about the hiatus
I'm moving cross-country shortly. I haven't made much progress on the project because of that, and because there's been no donations for a long time. I'll continue construction of the Mk. III habitat after the move, once I've settled in. There's not much left to do but the stuff I need, I can't get, at least for the time being.
Sunday, November 14, 2010
Possible future project?
I can't believe two people independently had this idea. It gives me great hope for the future of humanity.
Saturday, November 13, 2010
Dremeling shit takes forever.
...But it's done. All the holes are precisely dremeled out. Here's the colony with the tunnels in place: Next I need to get ahold of a resin sealed wooden platform I can bolt the enclosures to, then I can seal it all up.
I plan to make the third enclosure (nearest the camera) the planter. That way it will be the last place air gets to, meaning the clover will recieve air with higher concentrations of CO2, which it needs to survive. Hamsters hanging out in that chamber will breathe easy due to close proximity to the oxygen emitting plants, everyone's happy. The alternative was to add another enclosure, pipe oxygen into all four, and let the stagnant air bleed out the seal of the central enclosure, but I didn't like that idea for obvious reasons. This one's tidier and safer overall. Now, where to get grow-LEDs...
 Next I need to get ahold of a resin sealed wooden platform I can bolt the enclosures to, then I can seal it all up.
 I plan to make the third enclosure (nearest the camera) the planter. That way it will be the last place air gets to, meaning the clover will recieve air with higher concentrations of CO2, which it needs to survive. Hamsters hanging out in that chamber will breathe easy due to close proximity to the oxygen emitting plants, everyone's happy. The alternative was to add another enclosure, pipe oxygen into all four, and let the stagnant air bleed out the seal of the central enclosure, but I didn't like that idea for obvious reasons. This one's tidier and safer overall. Now, where to get grow-LEDs...
Tuesday, November 9, 2010
Finally, progress to report!
Thanks to a steady trickle of donations plus a bit of my own money I was finally able to get these extra enclosures and the dremel necessary for expanding Hampture. You can see the Mk. II habitat in the back for a size comparison, and inspirational reading material in the lower right. :3 Next I'll need a sealed wood panel to bolt them to. I'll want them very secure before I glue/seal the tubes in place as trying to bolt them down after the fact might cause cracks.
Air will flow in to either of the two side enclosures, through the main exercise room, then into the bottom enclosure and out a one-way air release valve. This model will release air directly into the water as the Mk. II taught me that maintaining a 1 atmosphere habitat via air return tube requires precisely measured pump strength or you wind up with a slight overpressure that forces bubbles through the seal (as seen in the video). That's not a big deal for a few hours here and there but I'd rather the seals not somehow weaken over time as a result, so the Mk. III habitat will be ambient pressure. At 8 feet deep, the increase in pressure won't be significant enough for the hamster to so much as feel it, although I may want to raise/lower it at a leisurely pace to be on the safe side.
Side note; The Mk.III will have a power cable instead of an air return tube, this time for powering the heating pads, one for each room. I can't really rely on battery power for that many heaters and the clover aquaculture room will require grow lights. Still shopping around for compact grow LED arrays.
We're close, guys. This is really gonna happen.
 Next I'll need a sealed wood panel to bolt them to. I'll want them very secure before I glue/seal the tubes in place as trying to bolt them down after the fact might cause cracks.
 Air will flow in to either of the two side enclosures, through the main exercise room, then into the bottom enclosure and out a one-way air release valve. This model will release air directly into the water as the Mk. II taught me that maintaining a 1 atmosphere habitat via air return tube requires precisely measured pump strength or you wind up with a slight overpressure that forces bubbles through the seal (as seen in the video). That's not a big deal for a few hours here and there but I'd rather the seals not somehow weaken over time as a result, so the Mk. III habitat will be ambient pressure. At 8 feet deep, the increase in pressure won't be significant enough for the hamster to so much as feel it, although I may want to raise/lower it at a leisurely pace to be on the safe side.
Side note; The Mk.III will have a power cable instead of an air return tube, this time for powering the heating pads, one for each room. I can't really rely on battery power for that many heaters and the clover aquaculture room will require grow lights. Still shopping around for compact grow LED arrays.
We're close, guys. This is really gonna happen.
Monday, November 1, 2010
Hampture Mk. III is coming together nicely.
The acrylic tube sections arrived today along with the largest enclosure. Below you can see the planned layout, though of course the tubes aren't 'installed' yet. There's room for another enclosure if I can think of a good reason to add it, but in all honesty three is probably plenty. I want to conserve funds for Project Earth Rover so unless someone can pitch a convincing rationale for adding another enclosure, this is probably as big as Hampture will get.
Next up; need to buy a dremel tool to make the holes for the tubes, and buy some kind of platform I can secure the enclosures to. Movin' forward!
 There's room for another enclosure if I can think of a good reason to add it, but in all honesty three is probably plenty. I want to conserve funds for Project Earth Rover so unless someone can pitch a convincing rationale for adding another enclosure, this is probably as big as Hampture will get.
Next up; need to buy a dremel tool to make the holes for the tubes, and buy some kind of platform I can secure the enclosures to. Movin' forward!
Tuesday, October 26, 2010
Growing plants underwater.
This is a suggestion from the early days of the project that I've given a lot of thought to and decided to pursue. I won't make the colony reliant on plants for air as that would endanger the hamsters. However it will supplement the air, act as a backup food supply and be generally neat as fuck: Why clover? Why not blue green alage? Well, a couple reasons. Clover thrives even in dry conditions, meaning I don't have to water it often. It also thrives with minimal sunlight, meaning even a meager blue/IR LED array will suffice. Last, hamsters love it. It's a treat for them, as there's a sort of sugary nectar inside the leaves and stem they really enjoy. By comparison blue green algae offers efficient production of oxygen (a function we don't need) but cannot be eaten, and is more difficult to successfully cultivate.
So, for our purposes, clover seems ideal. I can simply spray the "crops" with a mister every time I raise the colony to clean out the other parts, and the lights will do the rest. This does mean I'll need to add a USB power cable to the umbilical, however. But given that I'll soon be dremeling out a 1.5 inch hole in each enclosure, and given how perfectly silicone sealant seems to protect against water getting in, I'm no longer skittish about breaching the habitat walls to pass cables inside. Any idea where I can get a 24 foot long USB extension cord?
 Why clover? Why not blue green alage? Well, a couple reasons. Clover thrives even in dry conditions, meaning I don't have to water it often. It also thrives with minimal sunlight, meaning even a meager blue/IR LED array will suffice. Last, hamsters love it. It's a treat for them, as there's a sort of sugary nectar inside the leaves and stem they really enjoy. By comparison blue green algae offers efficient production of oxygen (a function we don't need) but cannot be eaten, and is more difficult to successfully cultivate.
So, for our purposes, clover seems ideal. I can simply spray the "crops" with a mister every time I raise the colony to clean out the other parts, and the lights will do the rest. This does mean I'll need to add a USB power cable to the umbilical, however. But given that I'll soon be dremeling out a 1.5 inch hole in each enclosure, and given how perfectly silicone sealant seems to protect against water getting in, I'm no longer skittish about breaching the habitat walls to pass cables inside. Any idea where I can get a 24 foot long USB extension cord?
Monday, October 25, 2010
TUUUUUBES
Welp, eight feet of 1.5 inch diameter transparent acrylic tubing cost me $52, including shipping. I've instructed that it should arrive precut into sixteen 6 inch long sections. Overkill for what I need but there was a minimum on the amount you could order. This means the sky (or budget) is basically the limit on potential future expansions. I can add damn near anything with at least one flat surface, made of transparent material, and watertight or easily made so.
I still need materials to build the platform to which the enclosures will be bolted. I'm thinking erector set. They have large panels govered in a grid of holes with standard sized bolts, perfect for building exactly the size and shape platform I need. I'll position the enclosures, drill holes in their floors, bolt them down and then seal the area where the bolt passes through the enclosure floor with silicone sealant.
I'll be bolting them down after I dremel-out the holes for the tubes, but before I actually add the tube and glue/seal it into place. My reasoning being that if I fix the tube to the two enclosures with glue and sealant beforehand, when I bolt them down, forcing them flat like that might crack the seal where the tube passes through the enclosure wall. Better to add the tubes when they're already bolted down and let the glue dry, then add sealant.
So, a general purpose erector set with plenty of large panels, and a dremel. Can anyone suggest good candidates for either?
 This means the sky (or budget) is basically the limit on potential future expansions. I can add damn near anything with at least one flat surface, made of transparent material, and watertight or easily made so.
 I still need materials to build the platform to which the enclosures will be bolted. I'm thinking erector set. They have large panels govered in a grid of holes with standard sized bolts, perfect for building exactly the size and shape platform I need. I'll position the enclosures, drill holes in their floors, bolt them down and then seal the area where the bolt passes through the enclosure floor with silicone sealant.
I'll be bolting them down after I dremel-out the holes for the tubes, but before I actually add the tube and glue/seal it into place. My reasoning being that if I fix the tube to the two enclosures with glue and sealant beforehand, when I bolt them down, forcing them flat like that might crack the seal where the tube passes through the enclosure wall. Better to add the tubes when they're already bolted down and let the glue dry, then add sealant.
So, a general purpose erector set with plenty of large panels, and a dremel. Can anyone suggest good candidates for either?
Friday, October 22, 2010
Hampture Mk. III.
Well, I've gone ahead and purchased the large Lexan drybox that will house the running saucer. Combined with the other similar enclosure I bought ages ago I will soon have three. Rather than let the smaller one go to waste, I'm going to skip straight ahead to a three-enclosure habitat! As you can see the weighted base will leave room for two additional enclosures to be added at a future date. But even with three enclosures, I believe it will be more than large enough to accommodate a second hamster, whom I have decided to name "Hamdrew Ryan".
The final five-enclosure 'city' will house four hamsters total. The additional two will be named "Ratlas" and "Nomtaine" unless someone suggests names I like better.
 As you can see the weighted base will leave room for two additional enclosures to be added at a future date. But even with three enclosures, I believe it will be more than large enough to accommodate a second hamster, whom I have decided to name "Hamdrew Ryan".
The final five-enclosure 'city' will house four hamsters total. The additional two will be named "Ratlas" and "Nomtaine" unless someone suggests names I like better.
Thursday, October 21, 2010
Hamster submarine?
Some of you suggested it a long time ago. I laughed it off as unreasonable. But then I found this: It's a decent RC sub with a watertight enclosure for a camera. But of course, the camera is removable. That means in theory it could be used to record video flybys of the habitat from outside, or with the addition of a compressed air canister (and a weight to counteract it's buoyancy) little Megafucker could go on submarine missions.
Unfortunately it costs about $700. But hey, maybe someday.
 It's a decent RC sub with a watertight enclosure for a camera. But of course, the camera is removable. That means in theory it could be used to record video flybys of the habitat from outside, or with the addition of a compressed air canister (and a weight to counteract it's buoyancy) little Megafucker could go on submarine missions.
 Unfortunately it costs about $700. But hey, maybe someday.
Wednesday, October 20, 2010
The room for the running saucer.
"Running saucer? What's that?" Well, it's this thing: The enclosures I've been looking at have plentiful horizontal space, they're just not very "tall", which made fitting a wheel inside (without mounting the enclosure sideways and having it be permanently sealed) pretty impossible. Until I found this thing. It's what Megafucker has been using for exercise ever since I took him home. It's compact and will fit neatly in one of two enclosures I've found.
The dilemma: Only one is rated for submersion. This one: As you can see it's opaque, which sucks. But it's scuba grade and rated for 100 feet deep. Overkill for what I need. The alternative is this fella:
 Slightly larger inside (though both will comfortably fit the saucer) but not rated to be submerged. I know this is bullshit to some degree as I have a spare drybox of the same type (but smaller) and it's watertight so far as I can tell from testing it in the pool.
The question is, play it safe and get an opaque enclosure for the exercise room? Or take a risk so that the whole habitat can be transparent?
 The enclosures I've been looking at have plentiful horizontal space, they're just not very "tall", which made fitting a wheel inside (without mounting the enclosure sideways and having it be permanently sealed) pretty impossible. Until I found this thing. It's what Megafucker has been using for exercise ever since I took him home. It's compact and will fit neatly in one of two enclosures I've found.
 The dilemma: Only one is rated for submersion. This one:
 As you can see it's opaque, which sucks. But it's scuba grade and rated for 100 feet deep. Overkill for what I need. The alternative is this fella:
 Slightly larger inside (though both will comfortably fit the saucer) but not rated to be submerged. I know this is bullshit to some degree as I have a spare drybox of the same type (but smaller) and it's watertight so far as I can tell from testing it in the pool.
 The question is, play it safe and get an opaque enclosure for the exercise room? Or take a risk so that the whole habitat can be transparent?
Monday, October 18, 2010
Expanding Hampture Mk.II
I went looking for clear plastic tubes some time ago for adding rooms to Hampture. This website will sell you them in a wide variety of diameters, 'wall thickness' and length. I'll have to do precise measurements of the habitat but offhand I think a 2 inch diameter tube would give the hamster plenty of room to crawl through (he's perhaps one inch wide) and it wouldn't exceed the dimensions of the habitat wall.
My current plan is to trace the outline of the tube, pressed up against the habitat wall. Then I'll drill a pilot hole, then use bigger drill bits to gradually widen it. From there I'll use a dremel to eat away at the plastic until I've completely cleared out the interior of the traced circle with as much precision as possible. Perhaps leaving a slight "rim" near the back so the tube has something to be mounted against. Then comes the gorilla glue for a firm hold, and the marine sealant around the edge.
I think I can afford the tubes, but I'll need a dremel tool and set of appropriate tips. I'm pretty confident this will work perfectly, and before long we'll have a multi-enclosure habitat.
 I'll have to do precise measurements of the habitat but offhand I think a 2 inch diameter tube would give the hamster plenty of room to crawl through (he's perhaps one inch wide) and it wouldn't exceed the dimensions of the habitat wall.
 My current plan is to trace the outline of the tube, pressed up against the habitat wall. Then I'll drill a pilot hole, then use bigger drill bits to gradually widen it. From there I'll use a dremel to eat away at the plastic until I've completely cleared out the interior of the traced circle with as much precision as possible. Perhaps leaving a slight "rim" near the back so the tube has something to be mounted against. Then comes the gorilla glue for a firm hold, and the marine sealant around the edge.
I think I can afford the tubes, but I'll need a dremel tool and set of appropriate tips. I'm pretty confident this will work perfectly, and before long we'll have a multi-enclosure habitat.
Sunday, October 17, 2010
Announcing Project Earth Rover.
 Fear not, Project Hampture will continue as planned, with new rooms being added as funding permits. But I've got many other project ideas I'd like to pursue, and I hope everyone who followed along with Project Hampture will be just as captivated by Project Earth Rover. My hope is that it will more directly involve you guys, as once complete, anyone will be able to use the robot(s).
Post your thoughts in the comments!
Saturday, October 16, 2010
Looking to the future.
If there's real demand to see it happen, provided I can raise the money ($3,400) an aquarium like this would make an incredible permanent seafloor colony. It's big enough I could add LED grow lights to cultivate algae and wheatgrass, actively supplying oxygen and processing waste. As the pump I have right now is sufficient to sustain 15 hamsters, A structure like this could easily accommodate six hamsters (one per room) along with an exercise wheel, a filtered water spout, pretty much anything imaginable. This would be the true Hampture.
Until I can find an incredible wealthy, crazy donor however, I'll keep adding rooms to the Mk.II habitat as I can afford to. Someday...
 It's big enough I could add LED grow lights to cultivate algae and wheatgrass, actively supplying oxygen and processing waste. As the pump I have right now is sufficient to sustain 15 hamsters, A structure like this could easily accommodate six hamsters (one per room) along with an exercise wheel, a filtered water spout, pretty much anything imaginable. This would be the true Hampture.
 Until I can find an incredible wealthy, crazy donor however, I'll keep adding rooms to the Mk.II habitat as I can afford to. Someday...
Friday, October 15, 2010
Project Hampture: Lake Mission is complete.
....And ass-blastingly successful. I couldn't have hoped for a better result. See for yourself:
Today's the big day.
I'm heading out to deploy the habitat in a nearby lake soon. While you wait, here's a video of last night's deep water test in the pool. 20 minutes at 8 feet deep, without a hitch!
Keep your eyes on this space. The mission will last an unprecedented five hours if all goes as planned, and it'll be two or three hours to encode and upload the video after that. But wow, it's finally happening right?
UPDATE: Left for the lake at 1:30pm
UPDATE: returned from deployment at 3:15.
UPDATE: Checked on the surface support station twice now. Air's flowing fine, battery is holding steady at 75%.
UPDATE: Retrieved habitat a little after 7pm. Currently preparing the video for upload.
UPDATE: Uploading video, should be done around 9:15pm EST.
Final update: Mission complete. Video uploaded, and included in a new post.
Thursday, October 14, 2010
The habitat is finally complete.
The pump arrived today, and after fixing it to the battery pack and hooking up the air hose I switched everything on, and placed a finger over the air return. It works.  Air flows readily through the entire system and based on tests conducted yesterday, the habitat is fully watertight. It's done. Everything is in place. All that remains is to spend the day testing it above water, in the bathtub and in the pool. Tomorrow, we launch.
UPDATE: over-water tests concluded, hamster seems fine. Started bathub test about 15 minutes ago:
 The sound of rushing water sent him into a panic, but once the faucet was turned off and the tub full, he settled down pretty fast. There he is next to the light. I just checked on him, he's eating, looks pretty mellow. Doublechecked pump, air's circulating, so far so good.
UPDATE: Removed habitat after one hour. Resounding success. No ill effect, he didn't eat, drink or poop much and the battery pack hasn't depleted by even one bar. This bodes well for the possibility of longer term deployments.
UPDATE: Here's video from the interior during the bathtub test.
 Air flows readily through the entire system and based on tests conducted yesterday, the habitat is fully watertight. It's done. Everything is in place. All that remains is to spend the day testing it above water, in the bathtub and in the pool. Tomorrow, we launch.
UPDATE: over-water tests concluded, hamster seems fine. Started bathub test about 15 minutes ago:
 The sound of rushing water sent him into a panic, but once the faucet was turned off and the tub full, he settled down pretty fast. There he is next to the light. I just checked on him, he's eating, looks pretty mellow. Doublechecked pump, air's circulating, so far so good.
UPDATE: Removed habitat after one hour. Resounding success. No ill effect, he didn't eat, drink or poop much and the battery pack hasn't depleted by even one bar. This bodes well for the possibility of longer term deployments.
UPDATE: Here's video from the interior during the bathtub test.
Tuesday, October 12, 2010
While we wait for the pump....
Shit's gonna get all educational up in here and there's nothing you can do to stop it.
Today, October 12, marks the beginning of the latest mission on America's only undersea science base, the Aquarius. 60 feet deep and 4 miles off the coast of Florida it's main purpose is to monitor reef health (as they reflect the health of the ocean at large) although it was also handy for monitoring the spread of the oil spill recently.

 There's a twitter feed, a blog, and frequent live video events, and (when they get around to fixing them) live webcams. If I've succeeded at getting you interested in the notion of manned science bases on the sea floor, you'll want to follow this mission.
For the next 9 days, from October 12th to 21st at 12pm, you can catch the live daily broadcasts covering mission progress at this link.
Today, October 12, marks the beginning of the latest mission on America's only undersea science base, the Aquarius. 60 feet deep and 4 miles off the coast of Florida it's main purpose is to monitor reef health (as they reflect the health of the ocean at large) although it was also handy for monitoring the spread of the oil spill recently.


 There's a twitter feed, a blog, and frequent live video events, and (when they get around to fixing them) live webcams. If I've succeeded at getting you interested in the notion of manned science bases on the sea floor, you'll want to follow this mission.
For the next 9 days, from October 12th to 21st at 12pm, you can catch the live daily broadcasts covering mission progress at this link.
Sunday, October 10, 2010
Leaps and bounds.
I made a ton of progress today. Powerdrill? Purchased. Holes? drilled. Tubes? Glued and sealed in place. Heating pad? Soaked in bitter anti-chewing agent (meant for cats and dogs, but works fine on hamsters according to the clerk), then sealed in plastic wrap (so it won't spread a bad odor when activated (but he'll definitely be motivated to stop chewing if he punctures it) I've replaced the normal kitty litter with a fine grain corn-based litter. No 'dust' and it's not dangerous if he ingests some (though he seems to have no interest in it). I've also added an applewood chewing 'log' to satisfy his need to gnaw stuff, and coated every sensitive cable and electronics thingie inside the habitat with the bittering fluid. I saw the hamster try to chew a cable for a split second, then immediately stop and start pawing at his tongue. He hasn't touched it since. Works as advertised.
Here's little Mega-Fucker Supreme posing for a quick photo op (I opened it immediately afterward). Seems to be happily nomming the mixture of sunflower seeds, dried corn kernels and other goodies. He spent a minute or two probing the enclosure for weaknesses then seemed to resign himself to rolling around in the litter and trying to burrow into his food. :3

For housing little Megafucker between missions, I drilled some air holes in the old tuppermaid container that was going to be the bouy way back when and added food/water dishes, plus litter and more chew toys. It also has a little running "saucer" (like a wheel but dish shaped and at an angle) inside that I'm certain will fit in the largest transparent enclosure offered by Lexan (which I can permanently seal with the marine silicone glue to be doubly sure it's watertight at any depth. I would need a little extra money for that enclosure however.) The best news is I'm sure I can cut the holes needed for the tube walkways; this plastic doesn't seem prone to crack, even a little bit. When drilling the holes I found it remarkable how clean they wound up; If one of you felt like gifting me a dremel, I'm certain could easily widen them according to a marker-drawn outline on the wall. Hampture City is looking more viable by the day!
Saturday, October 9, 2010
The heater arrives!
Here's the habitat in it's present form, nearly ready for use: The heating element is that red patch on the wall. I'm thinking it should be wall mounted for a few reasons: First, so the hamster has a choice whether to be in contact with it or not. It's very warm to the touch (not uncomfortably so) and heat transfers very well through the feet; if I put it on the floor the hamster wouldn't have much choice but to walk on it. Also, although (as you can see) I've laid down a layer of kitty litter to handle waste, I'm worried urine might short it out. I could always seal it up with tape so it's moisture proof I guess. Thoughts on placement of the pad are welcome as I really haven't decided yet.
In the picture I'm testing how long it'll run on a 1500mah 5v battery. Still goin' strong after 2 hours, with only 40% of the energy used up. The battery that I'm actually using will be much smaller but roughly the same capacity, so we're looking at about 5 hours of heat. And the habitat should stay warm for a long while afterwards as this type of plastic is an excellent thermal insulator. I'm worried about keeping it cool enough actually, although the constant passage of air through the chamber should have a moderating effect, and by placing the pad on the wall I empower the hamster to regulate his own temperature by getting closer to or further from it.
In the third habitat, if this one is a success (and that appears certain) I'd like to have a power cable as part of the umbilical, and solar panels to keep the air pump, lights and heating pad running indefinitely.
 The heating element is that red patch on the wall. I'm thinking it should be wall mounted for a few reasons: First, so the hamster has a choice whether to be in contact with it or not. It's very warm to the touch (not uncomfortably so) and heat transfers very well through the feet; if I put it on the floor the hamster wouldn't have much choice but to walk on it. Also, although (as you can see) I've laid down a layer of kitty litter to handle waste, I'm worried urine might short it out. I could always seal it up with tape so it's moisture proof I guess. Thoughts on placement of the pad are welcome as I really haven't decided yet.
 In the picture I'm testing how long it'll run on a 1500mah 5v battery. Still goin' strong after 2 hours, with only 40% of the energy used up. The battery that I'm actually using will be much smaller but roughly the same capacity, so we're looking at about 5 hours of heat. And the habitat should stay warm for a long while afterwards as this type of plastic is an excellent thermal insulator. I'm worried about keeping it cool enough actually, although the constant passage of air through the chamber should have a moderating effect, and by placing the pad on the wall I empower the hamster to regulate his own temperature by getting closer to or further from it.
In the third habitat, if this one is a success (and that appears certain) I'd like to have a power cable as part of the umbilical, and solar panels to keep the air pump, lights and heating pad running indefinitely.
Friday, October 8, 2010
We're on the home stretch.
Here's the habitat in it's current incarnation, along with everything related to it that I have so far. This is really happening. My boner tingles with excitement. I just got a donation for the drill, and the deep water pump/heated gloves/battery pack are in the mail. Once I've drilled the holes, affixed the air tubes, sealed it with the marine silicone sealant (pictured) and installed the heater, we are go for Hampture deployment. (See the little stuffed mouse inside? That's roughly the size of an adult dwarf hamster, it's included to give a sense of scale.)
I've downloaded a TXT file of Atlas Shrugged and even at the smallest readable font, when printed on tiny 3*5"" pages (several per sheet of paper) it comes out to over 200 goddamn pages. I might omit that bizarre rape scene with Dagny in the train tunnel because while I think a hamster can handle living underwater, reading that shit might psychologically scar him.
By the way, after I've completed a series of animal habitats, I think something like this would be the ideal next project;
They make each one to spec for customers. Normally they have to be installed while you're putting in a pool as they use anchors at the bottom. But as seen in the video they can also be weighed down. A sufficiently large dome of this type, with a raised floor suspended above water level (leaving room to climb in and out) plus ballast for sinking it would make an affordable, portable one-man habitat. Thoughts?
 This is really happening. My boner tingles with excitement. I just got a donation for the drill, and the deep water pump/heated gloves/battery pack are in the mail. Once I've drilled the holes, affixed the air tubes, sealed it with the marine silicone sealant (pictured) and installed the heater, we are go for Hampture deployment. (See the little stuffed mouse inside? That's roughly the size of an adult dwarf hamster, it's included to give a sense of scale.)
I've downloaded a TXT file of Atlas Shrugged and even at the smallest readable font, when printed on tiny 3*5"" pages (several per sheet of paper) it comes out to over 200 goddamn pages. I might omit that bizarre rape scene with Dagny in the train tunnel because while I think a hamster can handle living underwater, reading that shit might psychologically scar him.
By the way, after I've completed a series of animal habitats, I think something like this would be the ideal next project;
They make each one to spec for customers. Normally they have to be installed while you're putting in a pool as they use anchors at the bottom. But as seen in the video they can also be weighed down. A sufficiently large dome of this type, with a raised floor suspended above water level (leaving room to climb in and out) plus ballast for sinking it would make an affordable, portable one-man habitat. Thoughts?
Wednesday, October 6, 2010
The battery pack arrives!
Man, this thing is a beast! Still, it's lighter than I expected, and it will fit in my backpack which means it won't be as difficult to get it to the lake as I'd feared. It takes 23 hours to fully charge it, and kept my laptop running for nearly 3 hours. Hey, for lead acid batteries that's pretty good, and laptops are energy hungry.
I now have almost everything I need. Still need about $30 for a power drill (I have the correct diameter drill bit though!) and the marine sealant (coming in the mail). Then I can drill the holes, seal the tube ends into them, fasten the enclosure to a weight, and test the entire apparatus in a nearby public pool. It's getting colder, few are using it, I should be able to get some time to myself. But wow, will I have some explaining to do if anyone catches me.
 It takes 23 hours to fully charge it, and kept my laptop running for nearly 3 hours. Hey, for lead acid batteries that's pretty good, and laptops are energy hungry.
 I now have almost everything I need. Still need about $30 for a power drill (I have the correct diameter drill bit though!) and the marine sealant (coming in the mail). Then I can drill the holes, seal the tube ends into them, fasten the enclosure to a weight, and test the entire apparatus in a nearby public pool. It's getting colder, few are using it, I should be able to get some time to myself. But wow, will I have some explaining to do if anyone catches me.
Monday, October 4, 2010
The difference in difficulty between imagining something and actually doing it is pretty large, guys.
I've received a lot of emails, to the effect that a single small enclosure is not impressive enough. These emails usually express the view that this project is unbelievably simple and easy, and that the current design is settling for mediocrity. Most demand some kind of multi-enclosure "City", with hamster tubes connecting them. Other demands include an algae colony for replenishing the air (without need of a surface pump) a small aquaculture pod to supply the hamster with plants to eat, waterproofed turbines outside to generate tidal power, a hamster wheel with electrical generator to keep the batteries charged, hamster mini-subs so they can leave the colony and explore, and so far my attempts to suggest that these are all far too elaborate for a one-man project scheduled to take no more than a month or two have been met with scorn, and the opinion that perhaps I'm too stupid for this project, that they "could do a way better job" if they "felt like it".
 This one is 7.7"x3.5"x7.4". It's wider than the one I have and not quite as tall, but it should add some much appreciated extra space, possibly for a second hamster.
The truth is that lots of things seem simple and easy until you actually try to do them. As I found out with the Mk. I habitat, it's harder than it seems in one's imagination to put something underwater, replenish it's air, and keep water out. This has been a learning process for me; what initially seemed like a pretty basic project has required me to do everything from calculating the lung volume and breathing rate of an adult dwarf hamster to working out whether the selected pump would replenish air fast enough, given it's cfm rating and the increase in water pressure at 8 feet.
I've also learned that water doesn't stay out of an enclosure just because you need it to, or because it seems like it will in your head as you study a potential enclosure. A lot goes into making a container watertight, and not just any will do. Not many companies sell watertight containers; many claim to but they are intended only for keeping clothing and documents dry in humid climes, not for being submerged, and many that claim they are safe to submerge instruct you never to submerge them below three feet. In the subset of available enclosures that are truly watertight and that will withstand pressure at useful depths, most are not transparent. If i had chosen an opaque enclosure it would probably have provoked an outcry. What's the point of putting it underwater, after all, if the interior camera (and hamster) cannot see the 'world' outside? But among the subset of watertight containers that are transparent, none are much larger than a shoebox. Anything bigger than that is typically briefcase sized, opaqe, intended for marine biologists carrying electronic equipment, and hundreds of dollars.
I did explain this to many of the critics who then accused me of being lazy for relying on ready-made enclosures. They asked why I don't simply build my own. Well, because I do not have infinite funding, a 3D printer, or access to a machine shop. If I had these things, I probably would.
However, I don't want to let any of you down. I can explain the difficulties involved in this project until I'm out of breath but at the end of the day, I want to delight rather than disappoint, which means I need to complicate the project in order to satisfy those of you who want to see something more elaborate than what I had planned. To that end, I have purchased a second enclosure;
 This one is 7.7"x3.5"x7.4". It's wider than the one I have and not quite as tall, but it should add some much appreciated extra space, possibly for a second hamster.
I plan to use the power drill I'm still waiting on donations for to drill a "pilot hole" in the wall of both boxes, after having traced the rim of the hamster tube in black marker on each wall as a guide. I'll then widen the hole gradually using a dremel tool (which I also don't have yet) until the hole on the wall of each enclosure is precisely the right size for the hamster tube. I'll then use the 3M Marine Grade Silicone Sealant to seal the rims, and the air holes in the tube.
It will be less structurally sound than a single contiguous enclosure but evidently one enclosure isn't enough, so here we are. My main concern is how I'll weigh this assemblage down without stressing the spots where the hamster tube connects with the wall of each enclosure. I'll need some kind of platform with lots of holes in it so that I can fasten the enclosures tightly to it with wire, and then attach weights evenly to the bottom of the platform:

So as to avoid making any of you wait, I'll be sinking the single-enclosure habitat sometime in November for repeated "missions". That way if something goes wrong when building the two-enclosure habitat (like the plastic cracks) all will not have been in vain.This will be interesting. It's not what I signed up for, but you've gotta give the people what they want.

So as to avoid making any of you wait, I'll be sinking the single-enclosure habitat sometime in November for repeated "missions". That way if something goes wrong when building the two-enclosure habitat (like the plastic cracks) all will not have been in vain.This will be interesting. It's not what I signed up for, but you've gotta give the people what they want.
Saturday, October 2, 2010
Enclosure arrives!
And having tested it in the bathtub, it's watertight as all hell. After checking about fifty times to make sure I didn't get my cock in the shot, I uploaded this video to simulate what it will be like from the hamster's point of view:
I'm holding it down by the edges to demonstrate that I don't have to hold the lid or anything, it really is watertight as advertised, and rated for 100 feet deep. As I'll only be submerging it 8 feet (perhaps 7 to be safe?) I have complete confidence in this thing.
Next up I'll need a power drill, so I can drill some holes for the aquarium air hoses. I'm considering two adjacent holes, one where I insert the tube till it touches the other end of the enclosure and another for a tube that barely pokes in; that way the air will have to traverse the entire interior as it's used, and the air delivery/return hoses will be close enough together where they exit the enclosure that I can wrap them around each other/tape them together into a single umbilical.
Friday, October 1, 2010
Undersea attractions; past, present and future
First we'll visit Israel, where Red Sea tourism in the 90's gave rise to a number of underwater attractions, including the Red Sea Star undersea restaurant:
 As well as this submerged observatory in a harbor, where tourists can watch ships arriving and departing as well as admire the reef fish:
This spa in the Maldives is, like the other attractions listed so far, in fairly shallow water and exposed at all times to the surface atmosphere via a stairwell: The Maldives seems to be a popular location for such attractions as it's also home to the Ithaa Undersea Restaurant, disappointingly shallow but with an enormous hemicylindrical acrylic enclosure:
 The upcoming Poseidon Undersea Resort will, by contrast, be situated 40 feet or so below the surface, nearly as far as some research habitats:


 If you're richer than the king of popes, the same company responsible for the Poseidon Resort is also selling extras of that disc-shaped pod at either end of the resort as a standalone undersea home:


 As well as this submerged observatory in a harbor, where tourists can watch ships arriving and departing as well as admire the reef fish:
This spa in the Maldives is, like the other attractions listed so far, in fairly shallow water and exposed at all times to the surface atmosphere via a stairwell:
 The Maldives seems to be a popular location for such attractions as it's also home to the Ithaa Undersea Restaurant, disappointingly shallow but with an enormous hemicylindrical acrylic enclosure:
 The upcoming Poseidon Undersea Resort will, by contrast, be situated 40 feet or so below the surface, nearly as far as some research habitats:


 If you're richer than the king of popes, the same company responsible for the Poseidon Resort is also selling extras of that disc-shaped pod at either end of the resort as a standalone undersea home:


Tuesday, September 28, 2010
While we wait for the new enclosure...
Because I like to educate rather than just appall, I've decided to showcase interesting undersea facilities from around the world, both already existing and planned. This is Sea Base 1, brainchild of the engineer behind several historical habitats like the Navy's Sealab, project FISSHH, Helgoland and Tektite I:
 It's open both to scientists and to seasoned divers looking for an interesting experience, but it'll run you $3,500 per week to stay there, so better start looking for healthy white babies to sell! For tips on using ordinary cosmetics to improve their resale value, email me.
Anyways the tip of the structure is 21 feet deep, and the bottom floor is 61 feet deep, pretty respectable considering that the NOAA's Aquarius (covered earlier) is situated at the same depth. Deep enough to rustle your jimmies, but shallow enough that daylight reaches, making for the sort of beautiful blue scenery that makes you think, "I probably don't need both kidneys". As I've already donated both and am sustained only by a powerful hatred for those new loud-ass sunchips bags, I've elected to raise the necessary funds by whoring my supple, manly body to lonely supermodels. It's a method of last resort, but chasing down majestic tropical sea life and eating it alive will make it all worthwhile.
It should be finished construction in 2013, exactly one year after retards believe the world will end. It will be hauled out in one piece and sunk amid the largest cluster of reefs in Belize. There it will become the first permanent undersea structure in history (all habitats up to this point were removed after their useful lifespan, like Logan's Run but with undersea habitats and without palm crystals or laser guns. So I guess nothing at all like Logan's Run, but I did manage to waste several seconds of your time with that terrible analogy.)

 It's open both to scientists and to seasoned divers looking for an interesting experience, but it'll run you $3,500 per week to stay there, so better start looking for healthy white babies to sell! For tips on using ordinary cosmetics to improve their resale value, email me.
 Anyways the tip of the structure is 21 feet deep, and the bottom floor is 61 feet deep, pretty respectable considering that the NOAA's Aquarius (covered earlier) is situated at the same depth. Deep enough to rustle your jimmies, but shallow enough that daylight reaches, making for the sort of beautiful blue scenery that makes you think, "I probably don't need both kidneys". As I've already donated both and am sustained only by a powerful hatred for those new loud-ass sunchips bags, I've elected to raise the necessary funds by whoring my supple, manly body to lonely supermodels. It's a method of last resort, but chasing down majestic tropical sea life and eating it alive will make it all worthwhile.
It should be finished construction in 2013, exactly one year after retards believe the world will end. It will be hauled out in one piece and sunk amid the largest cluster of reefs in Belize. There it will become the first permanent undersea structure in history (all habitats up to this point were removed after their useful lifespan, like Logan's Run but with undersea habitats and without palm crystals or laser guns. So I guess nothing at all like Logan's Run, but I did manage to waste several seconds of your time with that terrible analogy.)
Friday, September 24, 2010
Shit just got realer than ever.
Having tested the Mk.I habitat in the tub, it's no good. It keeps water out for the most part, but lets it rise just far enough to totally soak the dirt, even at the lowest flow level. It seems expressly designed to do this, probably because it was originally intended for use in an aquarium, and with gravel. Anyway I don't have any confidence in the ability of this thing to keep the hamster dry and safe, and I don't think it's safe to put electric lights and heating in either. As readers have urged me to put the hamster's safety above all else, I cannot in good conscience use this habitat shell.
Will I give up? Fuck no I won't. Because I lack the common sense which would otherwise restrain my ambitions, I'm going to rocket ahead and skip directly to building the Mk.II habitat: This means I'll need to carefully consider which enclosure to use as I'll need to be dead certain this time that it'll keep water out. Mainly so that this doesn't happen:
 That means back to square one, almost. I'll need a battery pack, a different pump, and of course a different enclosure. This is what I have my eye on:
 It looks ideal. Scuba dryboxes rated deeper than three feet or so tend to be pretty small. This was the largest I could find with a decent depth rating (100 feet!) with an interior volume of 7.549" x 3.606" x 3.326" (Online ruler for reference). I need to be able to fit the small video recorder (thumb sized), a small feeder, a water bottle/dish (as I've decided this will have no moon pool) and an LED light. Based on the combined sizes of these items and the enclosure as well as the small size of the breed of hamster I'll be using, I think the Otterbox 3500 will just suffice. Below is a mockup of the interior. When you click the image (and then expand it) it should appear actual size, and everything is precisely to scale relative to everything else:
 I plan to have the heater powered by a small USB battery pack inside the enclosure, sealed in a ziplock bag and packed under wood shavings (as some of you pointed out the hamster may be frightened and would be comforted if it could burrow). This means zero allowance for leaks, for obvious reasons. Which is why the new habitat will not have a power cable running down the umbilical, because I don't want to make more holes in the enclosure than I have to. This also means that the LED light will be self contained and battery powered as well.
Here's a list of things I still have that can be reused for the new habitat:
~video recorder
~LED light
~USB battery pack
~Air hose
~kitty litter (will be packed under the shavings to absorb urine)
Here are the things I need to continue:
~Deep water aquarium pump
~New enclosure
~Power drill
~Hot glue gun [edit: silicone sealant instead!]
~Portable battery pack
~USB heated gloves (for the heating element)
I can afford the hamster food, the feeder, the water bottle and wood shavings myself. The rest of it, not so much. I'm going to build this thing no matter what. But if you felt like speeding up the process by pitching in, I'd be grateful. I didn't realize how complex this project would become when I started and the setbacks have been frustrating but the concept is so great that I'm determined to make it work in the end, provided I can get my hands on the parts.
If you've got any suggestions for alternate component choices, or some kind of extra I could provide to compensate you guys for your donations (beyond the game servers I mean) let me know in the comments.
Will I give up? Fuck no I won't. Because I lack the common sense which would otherwise restrain my ambitions, I'm going to rocket ahead and skip directly to building the Mk.II habitat:
 This means I'll need to carefully consider which enclosure to use as I'll need to be dead certain this time that it'll keep water out. Mainly so that this doesn't happen:
 That means back to square one, almost. I'll need a battery pack, a different pump, and of course a different enclosure. This is what I have my eye on:
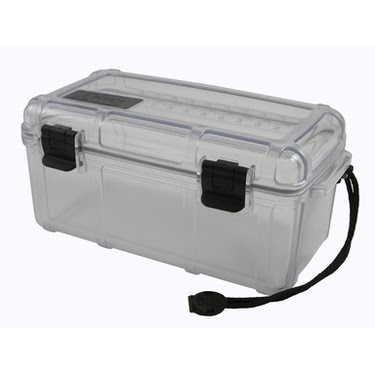 It looks ideal. Scuba dryboxes rated deeper than three feet or so tend to be pretty small. This was the largest I could find with a decent depth rating (100 feet!) with an interior volume of 7.549" x 3.606" x 3.326" (Online ruler for reference). I need to be able to fit the small video recorder (thumb sized), a small feeder, a water bottle/dish (as I've decided this will have no moon pool) and an LED light. Based on the combined sizes of these items and the enclosure as well as the small size of the breed of hamster I'll be using, I think the Otterbox 3500 will just suffice. Below is a mockup of the interior. When you click the image (and then expand it) it should appear actual size, and everything is precisely to scale relative to everything else:
 I plan to have the heater powered by a small USB battery pack inside the enclosure, sealed in a ziplock bag and packed under wood shavings (as some of you pointed out the hamster may be frightened and would be comforted if it could burrow). This means zero allowance for leaks, for obvious reasons. Which is why the new habitat will not have a power cable running down the umbilical, because I don't want to make more holes in the enclosure than I have to. This also means that the LED light will be self contained and battery powered as well.
Here's a list of things I still have that can be reused for the new habitat:
~video recorder
~LED light
~USB battery pack
~Air hose
~kitty litter (will be packed under the shavings to absorb urine)
Here are the things I need to continue:
~Deep water aquarium pump
~New enclosure
~Power drill
~Hot glue gun [edit: silicone sealant instead!]
~Portable battery pack
~USB heated gloves (for the heating element)
I can afford the hamster food, the feeder, the water bottle and wood shavings myself. The rest of it, not so much. I'm going to build this thing no matter what. But if you felt like speeding up the process by pitching in, I'd be grateful. I didn't realize how complex this project would become when I started and the setbacks have been frustrating but the concept is so great that I'm determined to make it work in the end, provided I can get my hands on the parts.
If you've got any suggestions for alternate component choices, or some kind of extra I could provide to compensate you guys for your donations (beyond the game servers I mean) let me know in the comments.
The habitat slowly comes together.
Everything seen below was originally purchased out of pocket but has since been covered by donations. It blows my mind but the world apparently demands to see brave individualist hamsters conquer the perilous depths. I'm in the process of tracking down a txt file of Atlas Shrugged so I can print it out using the wallet photo setting, which will give me pages small enough to fit the completed booklet inside of the habitat. To descend into the blue frontier means nothing if he takes the parasitic ideology of the looters with him~ >:O It seems to keep water out like a champ [edit: for about two minutes] but only when I persistently blow into the tube. I still need that one way safety valve. I'm also waiting on the LED lights and the replacement air pump. Once it's all put together I'll head down to petsmart and pick up a suitably intrepid-looking hamster pioneer. Current suggested names include Atlas, Fontaine, Nemo, and Mega-Fucker Supreme.
 It seems to keep water out like a champ [edit: for about two minutes] but only when I persistently blow into the tube. I still need that one way safety valve. I'm also waiting on the LED lights and the replacement air pump. Once it's all put together I'll head down to petsmart and pick up a suitably intrepid-looking hamster pioneer. Current suggested names include Atlas, Fontaine, Nemo, and Mega-Fucker Supreme.
Wednesday, September 22, 2010
Good news, bad news
Bad news: The air pump shipped to the wrong address. Holy shit. I literally cannot even put a hamster three feet underwater without some crucial aspect of my plan going wrong. This must be why I was turned down for that NASA administrative position. They're shipping me another one but won't spring for expedited delivery because they are greedy little shitgoblins so it'll be another week until I have it. Good news: The habitat shell arrives tomorrow, and I've almost got enough in donations to buy the automotive air compressor I'll be using for the Mk2 habitat's bouy! Even so the maximum depth I'll be able to sink it is ten feet. But that's pretty deep for a small mammal habitat. I'm gonna need some swim goggles and a well thought out excuse should anyone stop and ask why I'm swimming in the community lake.
By the way, definitely stop by the Minecraft server. I love talking to you guys about this stuff. I have other projects going on too that I won't discuss here, but that I'd be happy to tell you about ingame.
 Good news: The habitat shell arrives tomorrow, and I've almost got enough in donations to buy the automotive air compressor I'll be using for the Mk2 habitat's bouy! Even so the maximum depth I'll be able to sink it is ten feet. But that's pretty deep for a small mammal habitat. I'm gonna need some swim goggles and a well thought out excuse should anyone stop and ask why I'm swimming in the community lake.
By the way, definitely stop by the Minecraft server. I love talking to you guys about this stuff. I have other projects going on too that I won't discuss here, but that I'd be happy to tell you about ingame.
Monday, September 20, 2010
Gmod and Minecraft 'clubhouse' servers
Having given it about as much "carefully considered thought" as I give anything, and as I already host a Minecraft server (on an undersea colony map no less) it makes sense to tie it into the blog. As someplace those following it can gather and intelligently discuss hamsterkind's brave future beneath the waves, by which I mean grief the shit out of the map and make Bioshock jokes.
 It's restored from a backup copy any time I reset the server, so don't worry about damage. It isn't up 24/7 but you can rely on it being online in the evenings. Unless you live in the southern US, expect there to be lag. You may also disconnect from time to time. Don't sweat it, Minecraft's still in alpha and I do need to take the server down to reset the map now and then, just keep trying to reconnect.
A Gmod server using a custom map is also in the very early stages. Once complete it will supplement the Minecraft server as a sort of online gathering place for goofing off and discussing the particulars of life underwater. Or building rocket powered bathubs and beating each other to death with crowbars. Either way. Think of it as Second Life but with something to do besides build virtual dog dicks.

 It's restored from a backup copy any time I reset the server, so don't worry about damage. It isn't up 24/7 but you can rely on it being online in the evenings. Unless you live in the southern US, expect there to be lag. You may also disconnect from time to time. Don't sweat it, Minecraft's still in alpha and I do need to take the server down to reset the map now and then, just keep trying to reconnect.
 IP: 184.91.123.106
A Gmod server using a custom map is also in the very early stages. Once complete it will supplement the Minecraft server as a sort of online gathering place for goofing off and discussing the particulars of life underwater. Or building rocket powered bathubs and beating each other to death with crowbars. Either way. Think of it as Second Life but with something to do besides build virtual dog dicks.
It's more effort than I originally planned on putting in, but because I've recieved a pretty generous donation recently, I'm motivated to put something extra into the project and make it more engaging. I'll hang out in the server from time to time as well in case any of you want to talk to me directly.
Saturday, September 18, 2010
An informative promotional video.
Thanks to a fan of the comic for producing this art crime in Gmod. The propane tank at the end was added because I'd mentioned to him that if I can successfully build a series of increasingly larger and more complex habitats, I'd eventually like to buy a used outdoor propane storage tank (big enough to stand up in) and try my hand at converting it into a one man habitat rated for submergence in perhaps twenty feet of water.
MarineLab was repurposed from a used gas storage tank as well, so this is about what I could expect in terms of interior space:

A step up from my current apartment, anyway. I'd set up in the lake that I sometimes visit during the Summer, as I could run a waterproofed power and air hose from the cabin down to it. Trying to operate a habitat like this with a surface bouy would get very costly, very fast, because it would be constantly burning gasoline to drive the generator and air compressor. A powerline from the surface makes more sense, and if you're going that route, you may as well put the air compressor on land too. Not quite as cool as Hampture's self contained bouy system, but affordably supporting a human being underwater for extended periods necessitates certain compromises.
That's getting ahead of myself, though. First I must send a hamster to the lake's bottom, where he will become a rugged industrialist titan.
Friday, September 17, 2010
The habitat enclosure.
This morning, nestled tenderly in my inbox between "hot black sluts do it all on cam for you" and "Lifetime supply of Chipotle free click here" (The more tempting of the two offers, not for racial reasons but because I am a man who truly enjoys large burritos) I found a notice that my habitat enclosure had shipped. Here it is:

It's made by a company called Atlantis Underwater Islands, and it's intended to provide dry land for small turtles, frogs, newts and crabs in large aquariums. I will be completely disregarding that intent. Here it is without all the garnish added:

As you can see there are deep depressions for the soil, so it's possible for plants to take root. The "river" is fairly shallow by comparison. A dip in the river rim allows a bit of water to get into the soil every time the air pressure bubbles out and the water level rises slightly (it goes back down a moment later.)
I've pretty much copied, wholesale, how the Aquarius reef base works. Prepare your body for science. In all posts from now on I intend to examine actual undersea habitats of all types because they are kickin' rad and it seems like nobody knows about them. Here's a video tour of Aquarius that explains the moon pool and how it's used to pass surplus air out into the ocean.


Like Aquarius, Hampture Mk.I will rely on a surface bouy to pump air down to it (in order to keep the water out/refresh the atmosphere) and supply power for the lighting. Unlike Aquarius, Hampture will be a glorious bastion of Randian philosophy as practiced by a single dwarf hamster. Pretty much the same otherwise.
Subscribe to:
Posts (Atom)